简介
此项目是基于 编程不良人老师 的旅游管理项目的二次开发,结合树莓派,加入了物联网的功能;能够使用树莓派的摄像头对场景进行抓拍和监测,并在后台展示出来。
在这里先感谢老师的项目和课程,对于此项目的完成帮助非常大
思维导图
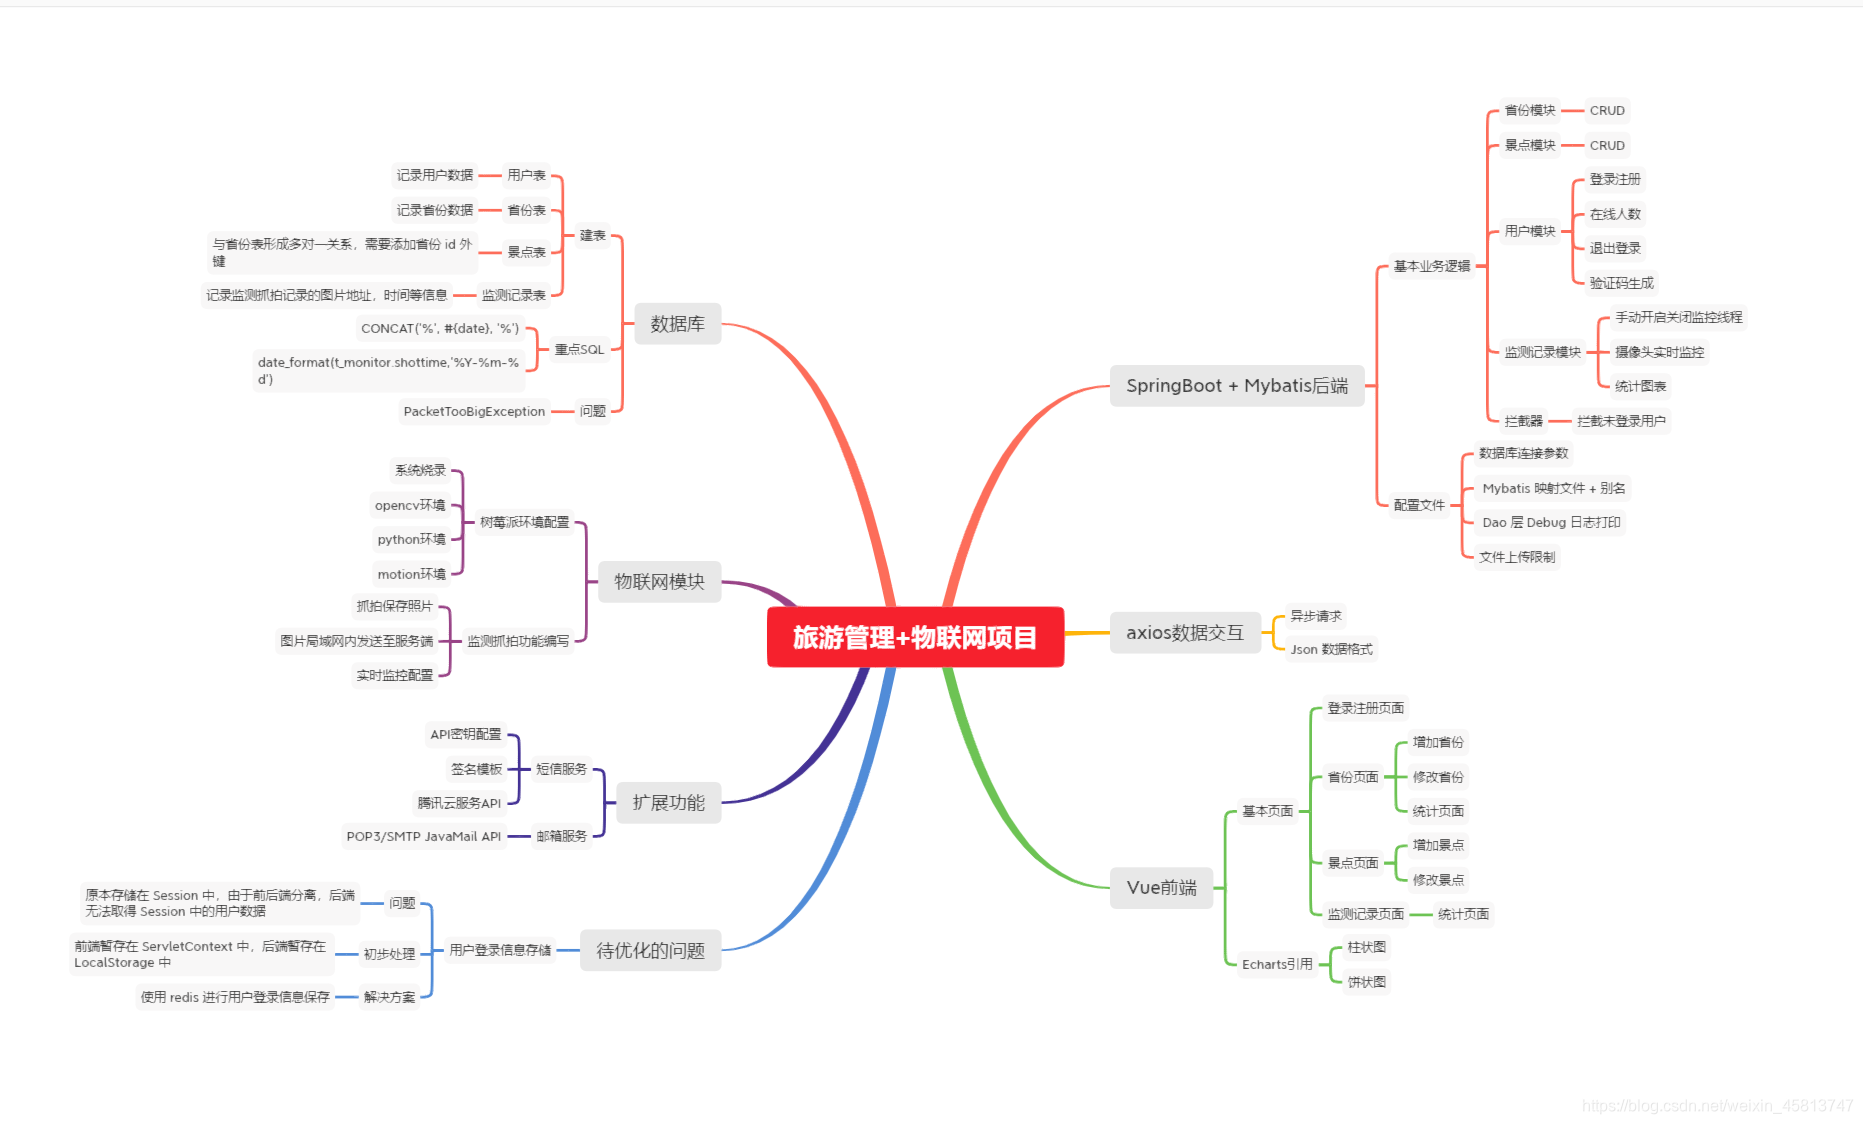
技术栈
- 后端:SpringBoot + Mybatis + Python
- 前端:Vue、Node.js
- 前后端交互:axios + json
开发流程
- 需求分析
- 基本需求:此项目是包含对旅游景点以及省份的基本操作,方便景点和省份的管理;同时集成了景点游客监测系统,通过python代码调用树莓派的摄像头实时传输图像到Web后端,进行图像的存储展示和处理,并通过邮箱和短信的方式通知管理员即使处理记录。
- 模块划分
- 用户模块:登录 + 注册
- 省份模块:省份 CRUD ,分页展示
- 景点模块:景点 CRUD , 分页展示,图片上传
- 监测记录模块:检测记录 CRUD , 分页展示, 实时监控,数据可视化展示
- 设计数据库
- 用户表:管理用户信息
- 省份表:管理省份信息,
- 景点表:管理景点信息,与省份表是 多对一 的关系
- 监测记录表:管理摄像头监测信息
- 编码:
- 环境搭建:SpringBoot环境,Vue环境
- 代码编写:后台代码,前台页面
- 项目调试
- 项目部署(未完成)
数据库
建表
注意景点表和省份表之间的 多对一 关系,给景点添加外键指向省份 id 即可
-- 省略用户表和省份表

drop table if exists t_place;
-- 景点表
create table t_place(
    id int(6) primary key auto_increment,
    name varchar(60),
    picpath MEDIUMTEXT,
    hottime TIMESTAMP,
    hotticket double(7,2),
    dimticket double(7,2),
    placedes varchar(300),
    provinceid int(6) REFERENCES t_province(id)
);

drop table if exists t_monitor;
-- 监测记录表
create table t_monitor(
  id int(6) primary key auto_increment,
  picpath varchar(100) comment '图片路径',
  shottime TIMESTAMP comment '拍摄时间',
  ischecked tinyint(1) comment '是否已被检查'
)
重难点Sql语句
CONCAT('%', #{date}, '%')使用sql函数拼接sql字符串,进行模糊查询
<!--分页查询所有  limit
第一个参数:第几行开始查询(包括该行)
第二个参数:要查询的行数  -->
<select id="findByPage" resultType="Monitor">
    select * from t_monitor
    <where>
        <if test="date != null">
            <!-- -->
            and shottime like CONCAT('%', #{date}, '%')
        </if>
    </where>
    order by id
    limit #{start}, #{rows}
</select>date_format(t_monitor.shottime,'%Y-%m-%d')截取timestamp的年月日部分yyyy-MM-dd字符串,进行分组查询,得到 每天的记录数量+对应年月日
<!--查询 日期对应的监控记录数的对象的List集合-->
<select id="findMonitorTotal" resultType="MonitorCountDate">
    select count(*) count, date_format(t_monitor.shottime,'%Y-%m-%d') date
    from t_monitor
    group by date_format(t_monitor.shottime,'%Y-%m-%d');
</select>
数据库遇到的问题
com.mysql.jdbc.PacketTooBigException
- 原因:MYSQL会根据配置文件会限制server接受的数据包大小
有时候在大的插入和更新会被max_allowed_packet 参数限制掉,导致失败 - 配置方法:
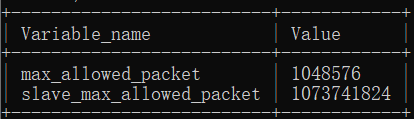
- 命令行登录mysql, 输入
show variables like '%max_allowed_packet%';
这是是我修改过后有10M,默认应该是4M - 修改配置,输入
set global max_allowed_packet = 1*1024*1024*10;设置为10M - 输入
quit;退出mysql - 重新进入输入
show variables like '%max_allowed_packet%';查看是否设置为10M
- 命令行登录mysql, 输入
- 同时还需要在springboot配置文件中修改最大上传文件的大小
# 单个文件大小最多为10mb,全部文件总大小为100mb
spring.servlet.multipart.max-file-size=10MB
spring.servlet.multipart.max-request-size=100MB
Mybatis主键插入自增
<!--保存Monitor对象-->
<insert id="save" parameterType="Monitor" useGeneratedKeys="true" keyProperty="id">
    insert into t_monitor values(#{id}, #{picPath}, #{shotTime}, #{isChecked})
</insert>
监听器
使用ServletContextAttributeListener属性监听器
监听ServletContext下的属性创建和销毁
@Component
public class ApplicationListener implements ServletContextAttributeListener {
    //在线人数
    //除去dispatcherServlet创建时的1个ServletContext对象添加和SpringBoot创建时的2个添加
    private int scc = -3;
    @Override
    public void attributeAdded(ServletContextAttributeEvent scae) {
        System.out.println("在线人数scc + 1");
        scc++;
        scae.getServletContext().setAttribute("scc", scc);
    }
    @Override
    public void attributeRemoved(ServletContextAttributeEvent scae) {
        System.out.println("在线人数scc - 1");
        scc--;
        scae.getServletContext().setAttribute("scc", scc);
    }
    @Override
    public void attributeReplaced(ServletContextAttributeEvent scae) {
    }
}
拦截器
拦截器配置,登录拦截
编写拦截器实现 HandlerInterceptor接口
public class AdminInterceptor implements HandlerInterceptor {
    @Override
    public boolean preHandle(HttpServletRequest request, HttpServletResponse response, Object handler) throws Exception {
        User user = (User) request.getServletContext().getAttribute("USER");
        if (user != null) {
            return true;
        } else {
            return false;
        }
    }
}编写拦截器配置类,排除登录注册,获取验证码等路径,/**代表所有路径
@Configuration
public class AdminInterceptorConfig implements WebMvcConfigurer {
    @Override
    public void addInterceptors(InterceptorRegistry registry) {
        //注册拦截器
        InterceptorRegistration registration = registry.addInterceptor(new AdminInterceptor());
        registration.addPathPatterns("/**").excludePathPatterns(
                "/**/user/login",
                "/**/user/register",
                "/**/user/getImage",
                "/**/*.html",
                "/**/*.css"
        );
    }
}
Vue前端
在Vue中引入ECharts
引入ECharts依赖文件
注意一定要在Vue 的 mounted生命周期中实例化ECharts变量,因为我们要确保dom元素已经挂载到页面中
同时要注意,由于表格数据是使用axios异步请求获得,所以实例化ECharts变量需要在异步请求获取到数据之后再执行,否则很有可能异步请求还没得到数据就开始实例化ECharts变量,导致图标加载不了
Vue单个元素绑定多个事件 例如点击绑定多个事件方法
比如 @click=“one();two()”用;隔开
Vue 中加载图片 public 和 src/assets 文件夹下的区别
- HTML
<img :src="imgUrl">- public 文件夹:
- 路径设置时无需添加 public/,默认加载 public 文件夹下的图片。
- 不需要使用 require,否则就变成在 src/assets 文件夹寻找。
- 系统编译后,可替换图片;
this.imgUrl = 'images/test.jpg';- src/assets 文件夹
- 需要使用 require,运行时就加载;
- 系统编译后,不能替换,因为被内部编译管理;
this.imgUrl = require('../assets/images/test.jpg');axios转换对象Boolean字段改变
axios将对象转换为json串 其中的booelan值字段被改变
如 isChecked 将会变成 chceked
@DateTimeFormat 和 @JsonFormat 注解
入参格式化 使用 Spring 的 @DateTimeFormat 注解格式化参数
@DateTimeFormat(pattern="yyyy-MM-dd HH:mm:ss")
private Date date;
传入参数:2018-08-02 22:05:55
传出参数:Thu Aug 02 22:05:55 CST 2018
@DateTimeFormat 注解的 pattern 属性值指定的日期时间格式并不是将要转换成的日期格式,这个指定的格式是和传入的参数对应的格式,如果传入的参数不为这个格式,将会抛出异常
出参格式化,需要用到 jackson 的 @JsonFormat 注解
@DateTimeFormat(pattern="yyyy-MM-dd HH:mm:ss")
@JsonFormat(
        pattern = "yyyy-MM-dd HH:mm:ss"
)
private Date date;
传入参数:2018-08-02 22:05:55
传出参数:2018-08-01 14:32:57
虽然时间格式正确了,但实际上当前时间是 “2018-08-01 22:32:57” ,早了8个小时。因为,jackson在序列化时间时是按照国际标准时间GMT进行格式化的,而在国内默认时区使用的是CST时区,两者相差8小时
所以还要加上一个属性
@JsonFormat(
    pattern = "yyyy-MM-dd HH:mm:ss",
    timezone = "GMT+8"
)
private Date date;
框架注解
Lombok链式调用
@Accessors(chain = true) 链式调用
result.setStatus(false).setMsg(e.getMessage());
@RestController
= @Controller + @ResponseBody
前端axios发送过来的user对象,是以json格式发送过来,所以需要加ResponseBody
@Param(“xxx”)
在接口方法中,方法参数之前,指定改参数在mapper中的名称,可以在mapper中使用#{xxx}拿到
前后端分离的验证码和登录session取不到解决方案
因为前后端分离,所以登录信息不能存入session,最好存入 redis 中, 现在先存入 ServletContext中,用户登录的 id 也传入前台,存入 localStoreage中
- 使用base64编码+ajax传输图片数据
//生成验证码图片
BufferedImage image = createImageCode.getBuffImg();
//进行base64编码
ByteArrayOutputStream bos = new ByteArrayOutputStream();
ImageIO.write(image, "png", bos);
String string = Base64Utils.encodeToString(bos.toByteArray());
result.put("key", key);
result.put("image", string);- 使用ServletContext存储验证码,无论那次请求都可以取到验证码,使用key绑定当前验证码的值
- 前端 js 添加解码base64前缀,发送异步请求获取图片,然后展示
<img :src="src" id="img-vcode" :key="key" @click="getImage">//获取验证码
getImage() {
_this = this;
axios.get("http://localhost:8989/user/getImage?oldKey=" + this.key).then((res)=>{
console.log(res.data);
_this.src = "data:image/png;base64," + res.data.image;
_this.key = res.data.key;
})
}参考
https://www.bilibili.com/video/BV1Nt4y127Jh
https://blog.csdn.net/sinat_31213021/article/details/116298077
https://blog.csdn.net/zhou520yue520/article/details/81348926
呜呜呜,我的powershot
୧( ⁼̴̶̤̀ω⁼̴̶̤́ )૭
powerstot。 yyds
力量giegie TQL